Showing posts with label Cooking. Show all posts

Saturday, December 15, 2007

Peanut Butter Cup Cookies

Peanut Butter Cup Cookies

SUBMITTED BY: Nancy PHOTO BY: chibi chef

"These cookies have a sweet peanut butter cup center."
SERVINGS & SCALING Original recipe yield: 40 cookies

INGREDIENTS

  • 1 3/4 cups all-purpose flour
  • 1/2 teaspoon salt
  • 1 teaspoon baking soda
  • 1/2 cup butter, softened
  • 1/2 cup white sugar
  • 1/2 cup peanut butter
  • 1/2 cup packed brown sugar
  • 1 egg, beaten
  • 1 teaspoon vanilla extract
  • 2 tablespoons milk
  • 40 miniature chocolate covered peanut butter cups, unwrapped

DIRECTIONS

  1. Preheat oven to 375 degrees F (190 degrees C).
  2. Sift together the flour, salt and baking soda; set aside.
  3. Cream together the butter, sugar, peanut butter and brown sugar until fluffy. Beat in the egg, vanilla and milk. Add the flour mixture; mix well.
  4. Shape into 40 balls and place each into an ungreased mini muffin pan.
  5. Bake at 375 degrees for about 8 minutes. Remove from oven and immediately press a mini peanut butter cup into each ball. Cool and carefully remove from pan.

Monday, December 3, 2007

Crackle Top Molasses Cookies

Crackle Top Molasses Cookies

SUBMITTED BY: Laurie

"These cookies taste like gingersnaps."
SERVINGS & SCALING Original recipe yield: 4 dozen

INGREDIENTS

  • 2/3 cup vegetable oil
  • 1 cup white sugar
  • 1 egg
  • 1/4 cup molasses
  • 2 cups all-purpose flour
  • 2 teaspoons baking soda
  • 1 teaspoon ground cinnamon
  • 1 teaspoon ground ginger
  • 1/2 teaspoon ground cloves
  • 1/3 cup white sugar

DIRECTIONS

  1. Preheat oven to 350 degrees F (180 degrees C).
  2. In a large bowl mix oil and 1 cup of sugar. Add egg, beat well. Stir in molasses, 2 cups flour, baking soda and spices. If necessary, add more flour to make a firm dough.
  3. Shape dough into 1 1/4 inch balls. Roll in 1/3 cup sugar. Place 3 inches apart on an ungreased baking sheet. Bake 12 to 14 minutes or until tops crack. Remove from baking sheet and cool on rack.

Cheesy Chicken and Potato Casserole

Cheesy Chicken and Potato Casserole

SUBMITTED BY: Trish

"This spud's for you! It is a cheese, potato and chicken delight! You can make the same dish with pork chops - it's great."

SERVINGS & SCALING Original recipe yield: 8 servings


INGREDIENTS

  • 3 teaspoons vegetable oil
  • 3 skinless, boneless chicken breasts
  • 1 (5.5 ounce) package scalloped potato mix
  • 4 potatoes, thinly sliced
  • 2 cups shredded Cheddar cheese

DIRECTIONS

  1. Preheat oven to 350 degrees F (175 degrees C).
  2. Heat oil in a medium skillet over medium high heat. Add chicken breasts and saute until tender. Meanwhile, prepare potatoes according to package directions, adding 1 cup (instead of 2/3 cup) of milk and sliced potatoes. When chicken is tender, remove from heat, let cool and shred. Add shredded chicken to potato mixture.
  3. Fold chicken/potato mixture into a 9x13 inch baking dish. Cover and bake in the preheated oven for 25 to 35 minutes. Add cheese and bake for another 10 minutes.

Tuesday, October 9, 2007

Asian Beef with Snow Peas

Asian Beef with Snow Peas

SUBMITTED BY: Holly

"Stir-fried beef in a light gingery sauce. Serve over steamed rice or hot egg noodles."

PREP TIME 5 Min
COOK TIME 10 Min
READY IN 15 Min
SERVINGS & SCALING
Original recipe yield: 4 servings

INGREDIENTS

  • 3 tablespoons soy sauce
  • 2 tablespoons rice wine
  • 1 tablespoon brown sugar
  • 1/2 teaspoon cornstarch
  • 1 tablespoon vegetable oil
  • 1 tablespoon minced fresh ginger root
  • 1 tablespoon minced garlic
  • 1 pound beef round steak, cut into thin strips
  • 8 ounces snow peas

DIRECTIONS

  1. In a small bowl, combine the soy sauce, rice wine, brown sugar and cornstarch. Set aside.
  2. Heat oil in a wok or skillet over medium high heat. Stir-fry ginger and garlic for 30 seconds. Add the steak and stir-fry for 2 minutes or until evenly browned. Add the snow peas and stir-fry for an additional 3 minutes. Add the soy sauce mixture, bring to a boil, stirring constantly. Lower heat and simmer until the sauce is thick and smooth. Serve immediately.

Saturday, January 27, 2007

Peanut Butter Temptations II

Peanut Butter Temptations II
SUBMITTED BY: Sally
"Peanut butter tarts with a chocolate covered peanut butter cup in the middle. You will need a mini muffin pan to make these."

Original recipe yield:
3 dozen


INGREDIENTS

  • 1/2 cup butter
  • 1/2 cup white sugar
  • 1/2 cup packed brown sugar
  • 1/2 cup peanut butter
  • 1 egg
  • 1/2 teaspoon vanilla extract
  • 1 1/4 cups all-purpose flour
  • 3/4 teaspoon baking soda
  • 1/2 teaspoon salt
  • 36 miniature chocolate covered peanut butter cups, unwrapped

DIRECTIONS

  1. Preheat oven to 375 degrees F (190 degrees C).
  2. In a medium bowl, cream together the brown sugar, white sugar and butter. Stir in the peanut butter, then the egg and vanilla. Sift together the flour, baking soda and salt, stir into the peanut butter mixture until the dough comes together. Shape into 1 inch balls and press them into the cups of an unprepared mini muffin pan.
  3. Bake for 8 to 10 minutes in the preheated oven. As soon as the cookies come out of the oven, press a mini chocolate covered peanut butter cup down into the center of each cookie until only the top is showing. Allow the cookies to cool completely before removing from their pans.

NUTRITION INFORMATION

Servings Per Recipe: 18

Amount Per Serving

Calories: 253

  • Total Fat: 14g
  • Cholesterol: 26mg
  • Sodium: 258mg
  • Total Carbs: 28.1g
  • Dietary Fiber: 1.2g
  • Protein: 4.7g

Wednesday, December 20, 2006

Donna's Lasagna

Donna's LasagnaSUBMITTED BY: Kathy Caswell
"This is a great tasting lasagna, and a family favorite."
Original recipe yield:
12 servings
PREP TIME 15 Min
COOK TIME 1 Hr 30 Min
READY IN 2 Hrs


INGREDIENTS

  • 1 pound lean ground beef
  • 8 ounces Italian sausage, casings removed
  • 1 (10.75 ounce) can tomato puree
  • 2 (6 ounce) cans tomato paste
  • 2 tablespoons white sugar
  • 1 teaspoon salt
  • 1 clove garlic, minced
  • 1 1/2 tablespoons dried parsley
  • 9 lasagna noodles
  • 3 cups cottage cheese
  • 2 eggs, beaten
  • 1/2 teaspoon ground black pepper
  • 1/2 cup grated Parmesan cheese
  • 1 1/2 tablespoons dried parsley
  • 1/2 teaspoon salt
  • 16 ounces sliced mozzarella cheese

DIRECTIONS

  1. Bring a large pot of lightly salted water to a boil. Cook pasta in boiling water for 8 to 10 minutes, or until al dente; drain.
  2. Meanwhile, prepare the sauce. In a large pot or Dutch oven, cook ground beef and sausage over medium heat until brown; drain. Stir in tomato puree, tomato paste, sugar, 1 teaspoon salt, garlic, and 1 1/2 tablespoons parsley. Reduce heat, and simmer uncovered for 30 minutes.
  3. In a bowl, stir together cottage cheese, eggs, pepper, Parmesan, 1 1/2 tablespoons parsley, and 1/2 teaspoon salt until blended.
  4. Preheat oven to 350 degrees F (175 degrees C). In a 9x13 inch baking dish, layer a third each of the noodles, sliced mozzarella, cottage cheese mixture, and meat sauce. Repeat layers twice.
  5. Bake lasagna in the preheated oven for 1 hour, or until hot and bubbly. Let stand 15 minutes before serving.
NUTRITION INFORMATION

Servings Per Recipe: 12

Amount Per Serving

Calories: 409

  • Total Fat: 19.8g
  • Cholesterol: 102mg
  • Sodium: 1249mg
  • Total Carbs: 26.4g
  • Dietary Fiber: 2.4g
  • Protein: 32.1g

Quick Onion Kuchen

Quick Onion Kuchen

SUBMITTED BY: Phyllis Drewes
"This is a great accompaniment to a dinner entree, or may be served as the entree, with a salad. Delicious!"
Original recipe yield:
1 (10 inch) quiche pan
PREP TIME 20 Min
COOK TIME 25 Min
READY IN 45 Min

INGREDIENTS

  • 2 tablespoons butter
  • 4 large onions, sliced
  • 4 slices rye bread
  • 2 eggs
  • 1 cup sour cream
  • 1/4 teaspoon salt
  • ground white pepper, to taste
  • 1/2 teaspoon caraway seeds
  • 4 slices bacon

DIRECTIONS

  1. Preheat oven to 350 degrees F (175 degrees C.) Heat butter in a large skillet. Saute the sliced onions until soft and translucent; set aside.
  2. Line a 10 inch quiche pan with bread. Place cooked onions in an even layer over the bread. In a small bowl, combine eggs, sour cream, salt, white pepper and caraway seeds. Pour egg mixture over bread and onions, then lay bacon strips over top.
  3. Bake in the preheated oven 25 to 30 for minutes, or until filling is set

  1. NUTRITION INFORMATION
  2. Servings Per Recipe: 6

    Amount Per Serving

    Calories: 330

  3. Total Fat: 25.1g
  4. Cholesterol: 111mg
  5. Sodium: 439mg
  6. Total Carbs: 19.3g
  7. Dietary Fiber: 2.4g
  8. Protein: 7.9g

Tuesday, December 19, 2006

Gingerbread Houses Advice

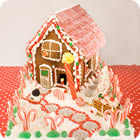
As Hansel and Gretel discovered, a gingerbread house is irresistible. It makes an impressive holiday centerpiece and is an enchanting activity for kids of all ages.

With our tested recipes, easy-to-follow template and decorating suggestions, it’s not so difficult--just gather your supplies, get creative and have some fun!

Nibble, nibble little mouse...Who is nibbling at my house?

Planning and Building

Here are supplies you'll need:

    • The pattern
    • Gingerbread dough: double the recipe
    • Rolling pin
    • Cookie sheets
    • Aluminum foil
    • Plywood base or heavy cardboard, doubled to support the house
    • Royal icing, recipe doubled
    • Pastry bags and decorating tips
    • Butter knife, palette knife or flat sandwich spreader
    • A damp cloth for quick clean-ups
    • Glue gun (optional)

Helpful tips:

  • Allow a weekend to complete the house
  • Have all supplies ready
  • Read all instructions before you begin: you will need to double the gingerbread recipe to have enough dough
  • Allow the gingerbread to cool thoroughly before assembling
  • Make icing ahead of time
  • Keep icing covered with a clean damp cloth (touching icing) and plastic wrap at all times to prevent it from drying out
  • Adjust the consistency of the icing by adding more egg whites if the icing is too dry or more powdered sugar if it is too wet. It should be thick and stiff.
  • Prepare the base for your house by covering plywood or heavy cardboard with several layers of foil
  • Use canned goods from the pantry to stabilize the walls during assembly; remove them before adding the roof


The house that Jack built

  • Visualize the "yard." Will you have a walkway? Trees? A fence? Set the house at an angle for a pleasing presentation.
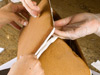
  • When assembling, apply a generous amount of icing to one side of the joint and press an un-iced side to the edge and hold until set. (See step-by-step articles for more photos.)
  • Apply icing-glue to the bottom of your pieces for more stability; adhere them to the foil/plywood base.
  • Allow 30 minutes for the front, side walls and back of house to dry and firmly set before adding the roof.
  • You’ll need an extra pair of hands when adding and securing the roof.
    Allow house to dry completely before decorating: a minimum of 4 hours, preferably overnight.


Problems?

  • Don't worry; you'll be able to fill gaps and cover errors later with more icing and decorations.
  • A fool-proof assembly method, if you're not going to eat the gingerbread, is to use a glue gun. Use icing to finish the look.
  • Icing can be kept at room temperature overnight. Be sure it is well-covered with a damp cloth and plastic wrap.
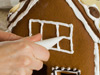
Decorating

This is the fun part! The decorations you choose are limited only by your imagination.

You’ll need:

    • Royal icing
    • Pastry bags and tips
    • Cookie sheets
    • Assorted candy (see step-by-step Gingerbread House articles)
    • Butter knife or flat sandwich spreader
    • Tweezers
    • Knife
    • Super glue (for adult use only; do not use if you will be eating the gingerbread house or candy)


Helpful tips

  • Have a plan for decorating. Think about how you want your house to look and what candy should go where.
  • Have candy and decorating supplies ready.
  • Save time and make accessory items ahead of time: snowmen, trees, carts, candles and

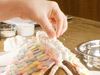
    fences can be made while you’re waiting for the house to dry.
  • Apply candy decorations by putting a small dab of icing to the underside of the candy and hold it in place until set.
  • Use extra dough scraps for decorative cut-outs.
  • Keep the tip of your pastry bag covered with a damp cloth in between decorating to prevent hardening.
  • Use tweezers to adhere small items to the house.
  • You may need super glue to adhere top-heavy items, like lamp posts.

    Storage

    Help your house survive the nibbles of your children!

    • Moisture is a decorated cookie’s worst enemy: display the house in a cool dry place.
    • Cover at night to seal out moisture and dust; lightly drape a clean trash bag over the house and base.
    • Gingerbread houses can last up to a year, if you choose not to eat them. Spray with a clear lacquer for maximum protection.
    • Cover with a plastic bag and store in a box with some Styrofoam “peanuts” to protect house from damage.